Are you troubled with Google Analytics installation? Are you confused about non-plugin and plugin methods?
Today we will show you the 3 practical ways to add Google Analytics Code to GeneratePress including the plugin approach, GeneratePress hook element approach, and Google Tag Manager approach.
We learned that the GP Elements module not just helped us in GA installation, but we could use it to install all kinds of scripts without impacting our website’s loading time, speed, and whatnot. So considering all benefits, we thought it is best to invest in GeneratePress premium and now we are extremely happy with our decision.
The GeneratePress premium version gives us 2 simple ways for Google Analytics Installation.
The plugin approach is always available for the free GeneratePress users but it may slow down your website. Unless you host your site on a good web hosting server, it is best to skip this and go with the GeneratePress Elements approach which comes inside a GeneratePress premium theme.
Did you know more than 80% of GeneratePress users choose the wrong GA installation method? This is why people are questioning non-stop about this topic on the GeneratePress Forum. See, Google has shown 719 GeneratePress results full of Google Analytics queries.

The GeneratePress team has explained the Google Analytics procedure in this forum post. However, this post has missing relevant information which we would be covering in this article.
By the end of this article, you will get the answers to these most asked queries:
- Things required for GA installation
- Google Analytics 4 installation on GeneratePress
- The wrong approach to installing Google Analytics
- GA installation on GeneratePress free version
- Upgrade Universal Google Analytics to Google Analytics 4 on GeneratePress
- More…
So without any delay, let’s dive in.
Table of Contents
- Why do We Need Google Analytics on our Website?
- Prerequisites For GA Installation on GeneratePress: Google Analytics Code
- The Only Proven Ways to Add Google Analytics Code to GeneratePress
- FAQs About Google Analytics Installation on GeneratePress
- Final Thoughts on Google Analytics Installation on GeneratePress
Why do We Need Google Analytics on our Website?
Google Analytics is a widely known comprehensive free web analysis tool existed in the market since 2005. Not just tracking page views, there could be dozens of things you could do with this web analysis tool which is not limited to:
- Track real-time traffic
- Analyzing user behavior
- Track user demographics
- Track conversion rate
- Reports and Performance analysis
- eCommerce tracking
- Track and measure social media channels’ performance
- And much more…
Prerequisites For GA Installation on GeneratePress: Google Analytics Code
In short, we require a Global Site Tag and tracking ID.
It doesn’t matter which method you are going to choose for Google Analytics installation on GeneratePress. You will require a “Google Analytics code and tracking ID” to proceed further.
In technical terms, the google analytics code is called “Global Site Tag” (gtag.js). This gtag.js is only used for installing GA via plugin and non-plugin methods, but not with google tag manager. So, get access to this code as well as the ID before actually implementing the steps.
The first step is to create a google analytics property for your website. Only then GA will generate a tracking ID for a website. We’re assuming that you should have already done this. If not, follow this procedure and create a Google Analytics property now.
So the property creation part is done? Now what?
Now you have to access a Google Analytics tracking code.
For people who are running universal or the old version of Google Analytics, the tracking code can be accessed via:
- Login to Google Analytics
- Universal Analytics Home > Admin > Tracking info > Tracking Code
To access Google Analytics 4 tracking code, first:
- Login to Google Analytics 4
- Google Analytics 4 Homepage > Admin > Setup Assistant > Tag Installation > Web Stream
The Only Proven Ways to Add Google Analytics Code to GeneratePress

To install Google Analytics:
Some people prefer the non-plugin approach, some are newbies who prefer plugins and some people are looking for the Google Tag Manager approach.
Today we will keep all the preferences in mind. We will start by discussing all 3 approaches first, then we will move to the practical steps.
Quick Note: Before jumping to the best methods for Google Analytics installation, it is important to have a look at this section below:
The Wrong Way to Add Google Analytics Code to GeneratePress:
We have seen dozens of people complaining over the GeneratePress forum about Google Analytics not working issue:

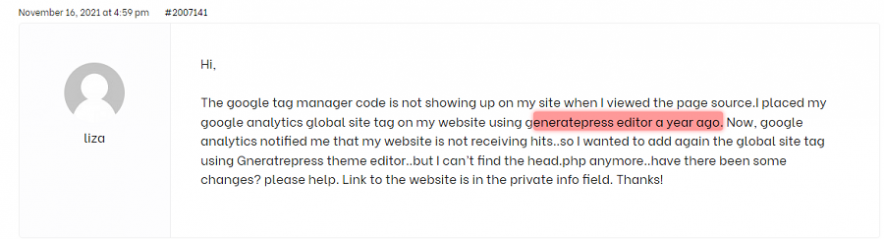
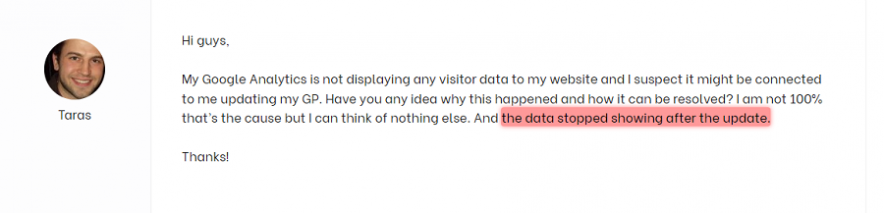
The reason behind the disappearance of the Google analytics data is most of the users are using the wrong technique to add Google Analytics code to generatepress theme.
They actually copy-paste the Google Analytics Tracking Code (gtag.js) directly into the header.php file – This is the wrong way.
Because as soon as the GeneratePress theme receives an update, the Google Analytics script will vanish.
Anyway. So here are the best ways for Google Analytics Installation in GeneratePress:
1. Using the GeneratePress Hook Element Technique (Non-Plugin Approach)
Quick Note: This method will apply to only GeneratePress premium version users.
Did you know the GeneratePress premium version comes up with the Elements module?
Elements Module is one of the primary reasons behind the popularity of the GeneratePress theme. This Elements module includes several elements, but the “hook” element is robust of all.
With this hook element, you can insert scripts (including Google Analytics script) into the website header, footer, body, etc. It eliminates the need for a child theme.
So basically, this is how we are going to use the “Element & Hook” technique for Google Analytics installation:
- First, we will create a hook element, which will be labeled as “Google Analytics
- Then we will insert the gtag.js script inside this hook.
- Finally, we will run this hook inside the header section of our entire section.
The only disadvantage of this approach is that it won’t work with GP free version.
2. WordPress Plugins Approach
Quick Note: This approach will work for both GeneratePress free & premium versions.
Just search “Google Analytics” inside the WordPress plugin repository, and you will be amazed that there are dozens of free plugins out there in the market which are primarily made for Google Analytics installation purposes.
So which one you should go for?
Well, the plugin size, will be the first factor you should consider for deciding on the plugin.
Currently, the most popular plugins for Google Analytics installation are:
- Insert Headers & Footers by WPBeginner – 35.16 KB
- GA Google Analytics by Jeff Star – 343.55kb
We have installed all these plugins on our website to figure out the lightest Google Analytics plugin. For calculating the plugin disk usage, We have taken the help of the “Disk Usage Sunburst” plugin.
The winner is Insert Headers & Footers plugin.
Compared to other plugins, the Insert headers & Footers plugin has its own advantages:
- Not just Google Analytics, You can use this plugin to embed any custom script on your website easily. Example Pinterest Tag, Facebook Pixel code, etc.
- Google Analytics script can be removed anytime with a single click.
- No chance of website crashes, because the plugin won’t edit the GeneratePress theme code directly.
3. Google Tag Manager Approach
Google Tag Manager is the hardest method for Google Analytics installation but comes up with tremendous advantages.
GTM is the free tool offered by Google that can be used to deploy scripts and snippets over a website without actually modifying the code.
Some of the popular usages of Google Tag Manager are:
- Google Analytics installation
- Conversion tracking
- Facebook Pixels installation
- Custom HTML scripts insertion
- Heatmap tracking
- .Click tracking
- Events Tracking
- And much More…
We only recommend Google Tag Manager when you have multiple reasons for installing it. Investing time in Google Tag Manager just for Google Analytics installation is not worth it.
To install Google Analytics with Google Tag Manager, we are going to take advantage of the GeneratePress hook element. So again, this method will only apply to GeneratePress premium users.
Now it’s time for practical steps…
How to Add Google Analytics Code to GeneratePress Using the GeneratePress Hook Element
The installation of Google Analytics code into Generatepress without a plugin could be done in the following 3 steps. The 3 steps are:
Total Time: 5 minutes
Step 1: Create a Hook Element
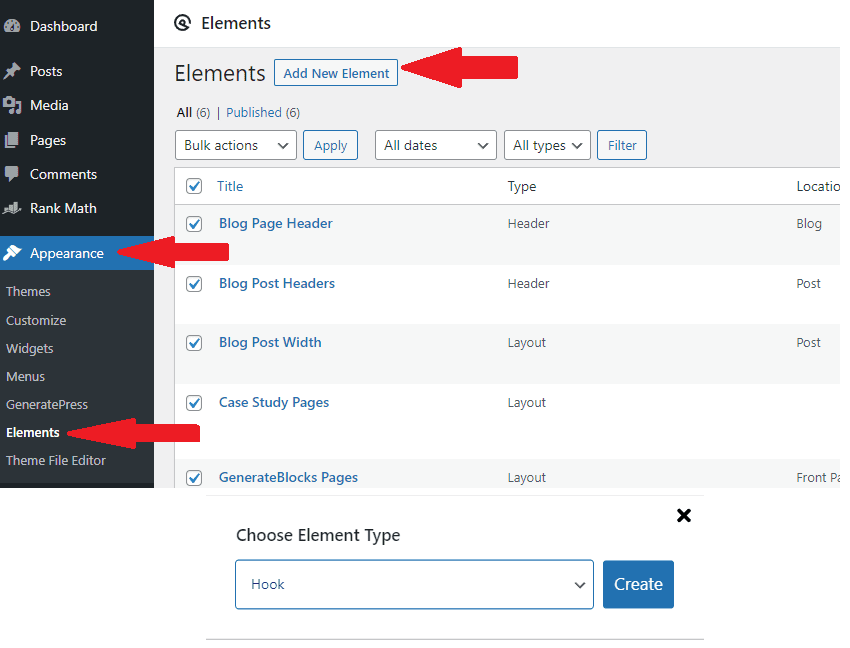
First thing first, Navigate to Appearance > Elements > Add New Element.
Then, Select hook element from the available element types and tap on the create button.
Step 2: Paste the Google Analytics Installation Code
You will be landed on the hook configuration page upon pressing a create button in the previous step.
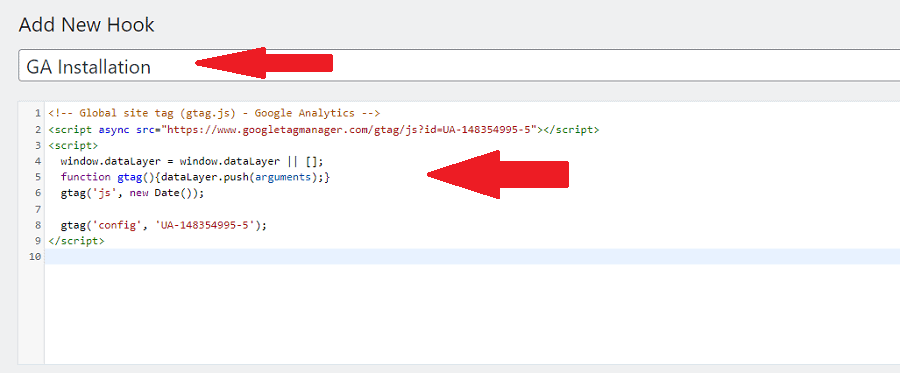
Here first Give a title (label) to the hook element. For example “GA Installation”.
Next, in the script column, paste the Google Analytics tracking code. (Consider checking the prerequisites section if you want to learn how to access the GA tracking code.)
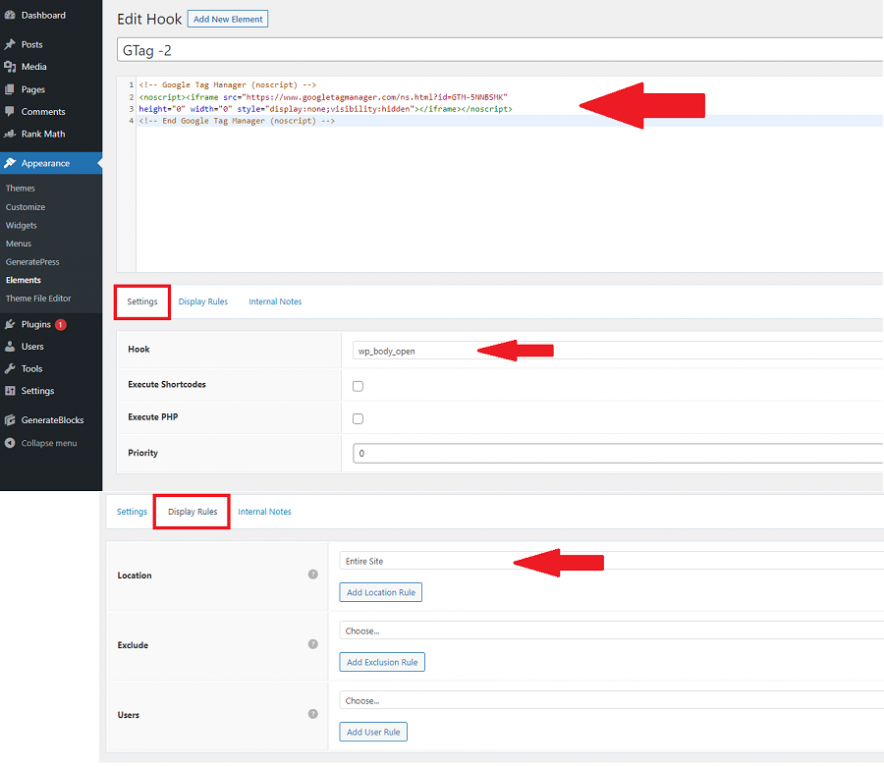
Step 3: Run the Google Analytics Hook on the Entire Website
The process is not finished yet. So far, You have only defined the script which is going to run for the hook
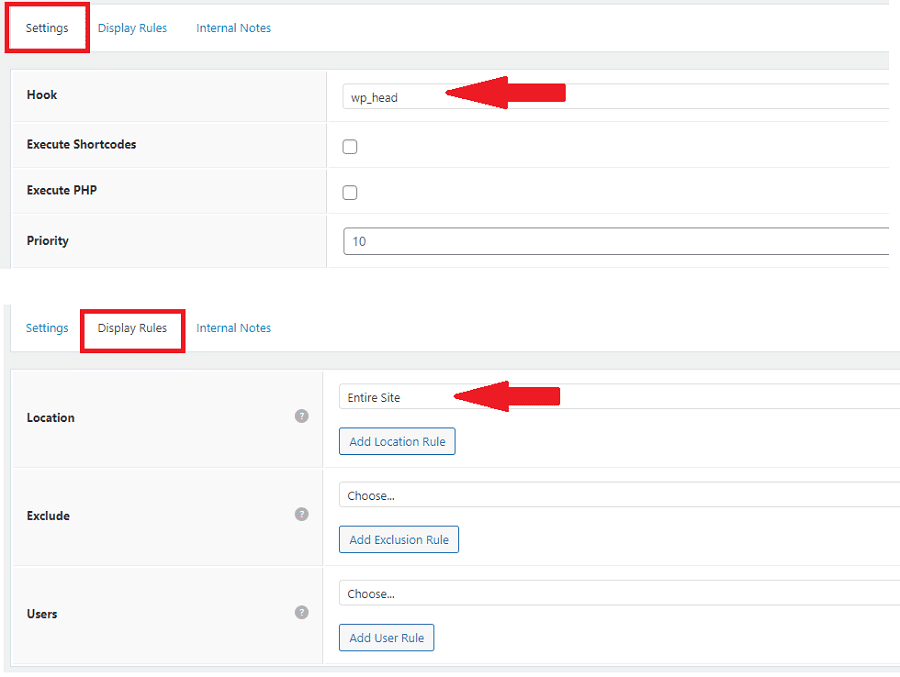
The 2 main steps are yet remaining. Under the script box, 2 tabs are mentioned: Settings and Display Rules:
Under the settings tab, select “wp_head” for the hook option. Leave other options unchanged.
Under the display rules tab, select “entire site” for the location option. Leave the rest of the options unchanged.
Finally, hit the publish button.
So this is how you can install Google Analytics to GeneratePress without any plugin. To verify Google Analytics installation, head over to the testing section of this article.
Estimated Cost: 59 USD
Supply:
- GeneratePress Premium Theme
- Google Analytics Tracking Code
Tools:
- GeneratePress Premium Theme
- Google Analytics
Materials: GeneratePress Premium Theme Google Analytics
Step 1: Get Access to the Google Analytics Code & Tracking ID
Before moving further, it is important to get a hands-on Google Analytics tracking code (gtag.js) for the website on which you are going to install GA.
We’ve explained the instructions for accessing a gtag.js code in the “Prerequisites” section of this article. Go through the section if you have not already.
As soon as you get your hands on the Google Analytics Tracking code, you are good to go.
Step 2: Install Insert Headers and Footers Free Plugin
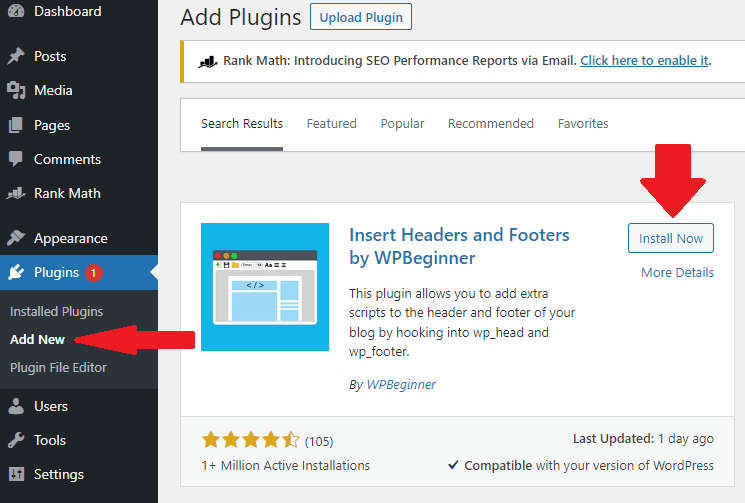
Login to the WordPress dashboard and navigate to Plugins > Add new. Search “insert headers and footers” inside the WordPress plugin repository.
As soon as you hit the search button, plenty of plugins will appear on your screen. You have to install the plugin developed by WPBeginner only. (See the image for reference.) After installation, don’t forget to activate the plugin.
Step 3: Place Google Analytics Code in Insert Headers & Footers Plugin
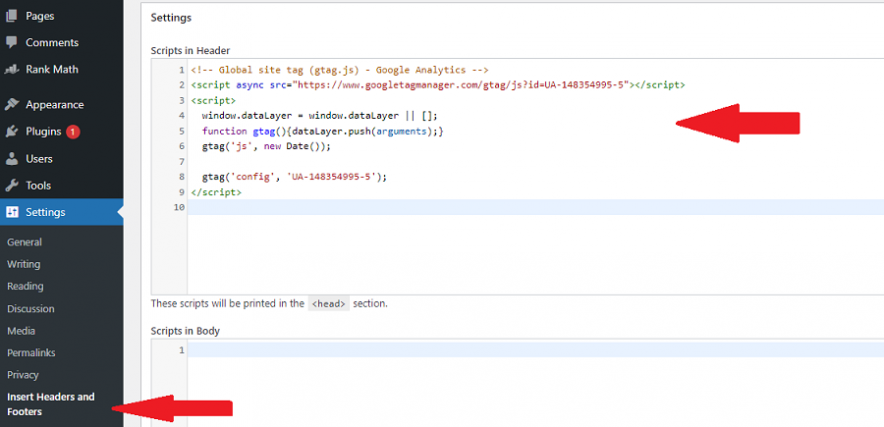
After plugin activation, Navigate to Settings > Insert Headers and Footers.
Now you are into the main interface of the plugin. As mentioned earlier, the Google Analytics tracking code will be installed on the header of the website.
By keeping this in mind, Paste the Google Analytics tracking code into the “Scripts in Header” box. And finally, tap the save changes button.
By doing this, the Google analytics script will be installed and reflected in the head section of the entire GeneratePress theme.
So this is how you can add Google Analytics code to GeneratePress.
The only thing left is to verify the “Google Analytics Installation”. For this please refer to the “Test Google Analytics” section of this article.
How to Install Google Analytics to GeneratePress using Google Tag Manager
Installing Google Analytics using the Google Tag Manager approach is never been simple.
With the help of the GeneratePress hook element technique, the whole process seems so simple and it only takes a few steps.
Step 1: Install Google Tag Manager on GeneratePress Website
Before installing Google Analytics, we have to install Google Tag Manager on GeneratePress.
We believe you have gone through the prerequisites section before coming here.
To install Google Tag manager on GeneratePress:
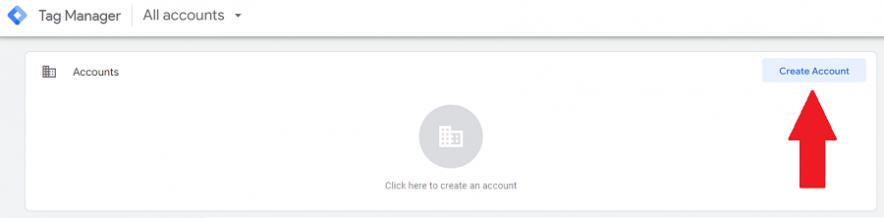
First, log in to the Google Tag Manager and create an account.
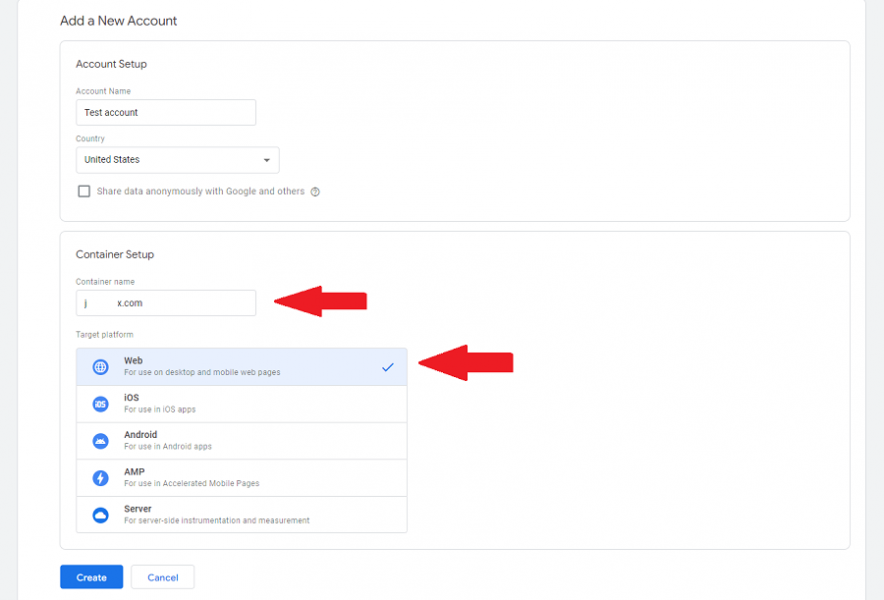
Under account setup, you also have to set up a container. It is best to set the container name as your website URL. Make sure to select “Web” and tap on the create button.
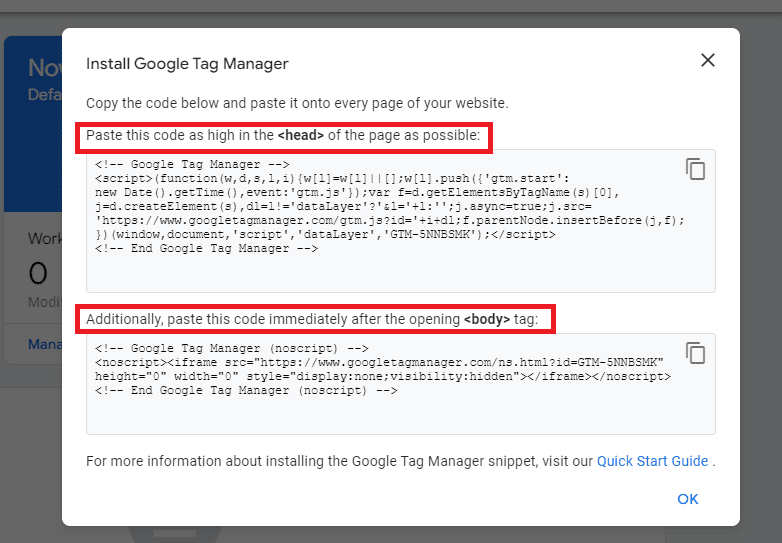
The first thing you will see on the Google Tag Manager is these code blocks. You have to paste these codes into the head and body section of a GeneratePress website. We will use the GeneratePress Element and hook technique again to get this done. If you are still using the GeneratePress free version, kindly upgrade.
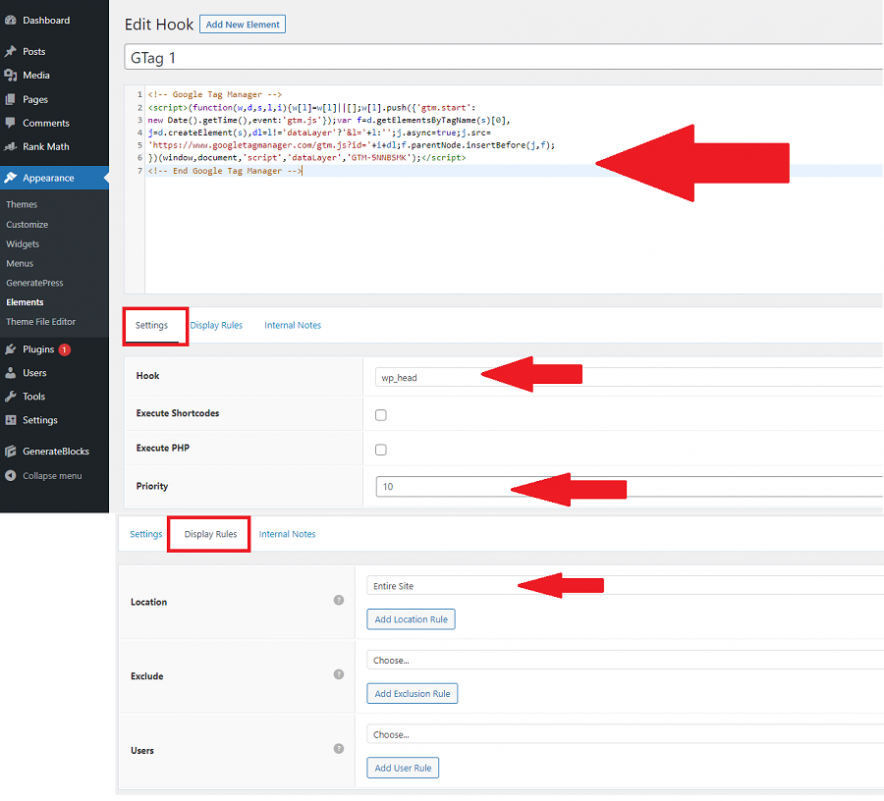
It’s time to create the first element which will contain the Google tag manager head section code.
- Head over to WordPress.
- Navigate to Appearance > Elements > Add new element and select hook.
- Copy and paste down the Google tag manager head section code
- In the settings tab, Select wp_head under the hook tab
- Set priority to 10
- Then, move to the Display Rules tab. Select “entire site” under the location dropdown menu and finally publish the element.
Next, we have to create the second element for the Tag manager body section code:
- Again tap on the add new element and select hook
- Copy and paste down the Google tag manager body section code
- In the settings tab, Select wp_body_open under the hook tab
- Set priority to 0
- Then under the display rules tab, select the entire site as a location and publish the element.
The Google Tag Manager on a GeneratePress has been installed successfully. Now we are free to create tags through GTM and run them on our website.
Step 2: Create a Google Analytics Tag inside GTM
It’s time to create a GA tag and fire it. So:
- Go back to Google Tag Manager
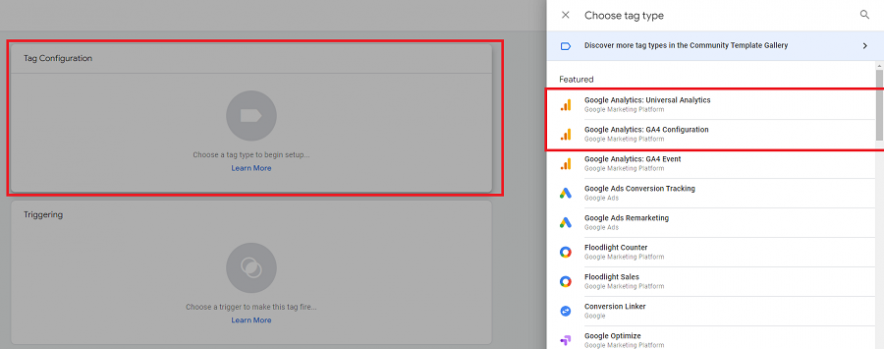
- From the dashboard, Navigate to Tags > New
- Depending on the Google Analytics property you have created for your website, choose either the Universal Analytics tag or GA4 tag. For this example, We are choosing a GA 4 configuration tag.
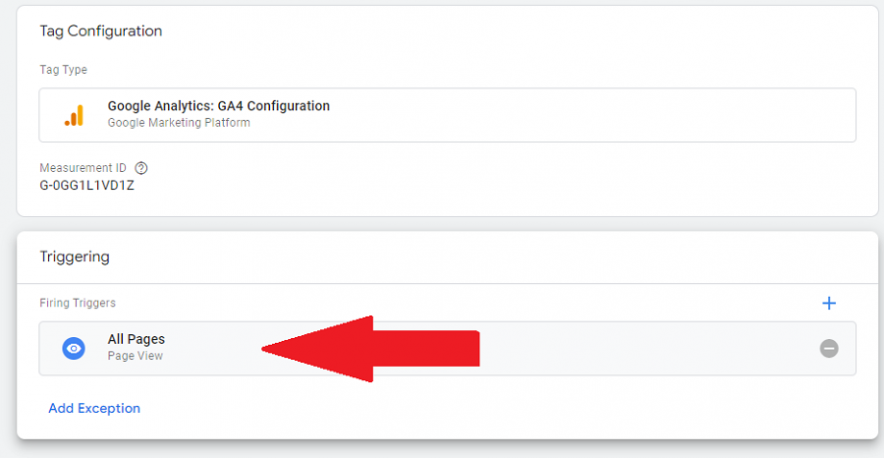
Step 3: Paste the Google Analytics Tracking ID
Upon tag creation, the first thing it will ask you to paste is the Measurement ID/ Tracking ID. We believe you have this credential. If not, navigate to the prerequisites section of this article.
Step 4: Select a Trigger
A tag without a trigger is useless. Google Tag Manager has prefined triggers based on the nature of tags. For example, We have selected the “All Pages” for Google Analytics tag so it will run on our entire website.
Step 5: Preview & Verify
At this point, the Google Analytics via tag manager has been added to your site. It’s time to test it.
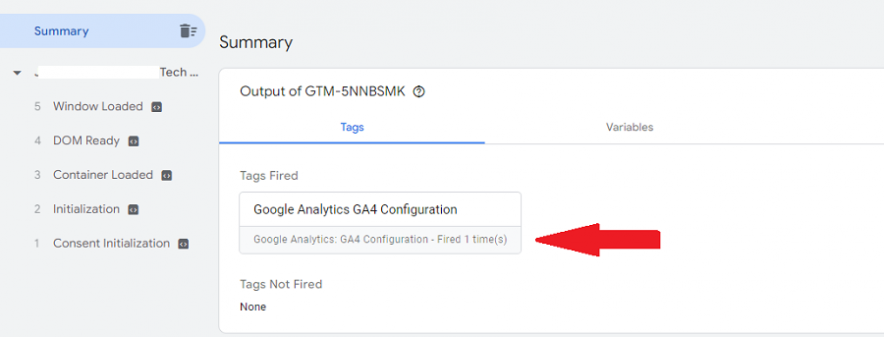
Gladly GTM has an in-house verification tool called Google Tag Assistant. Navigate to Tags Tab and tap on the preview button.

Upon tapping, the Google Tag Assitant will open up and run your website in real-time. It will open up your website in another browser window.
After a few seconds, it shows the summary. This summary included all Tags that are fired by Google Tag Manager on a website. If you see a “Google Analytics Tag” under the Tags fired tab then congrats you have done the job successfully.
So this is how you can add Google Analytics code to GeneratePress via Google Tag Manager.
Google Analytics Verification
Regardless of the method, you have picked for Google Analytics installation, you should check if Google Analytics is working or not.
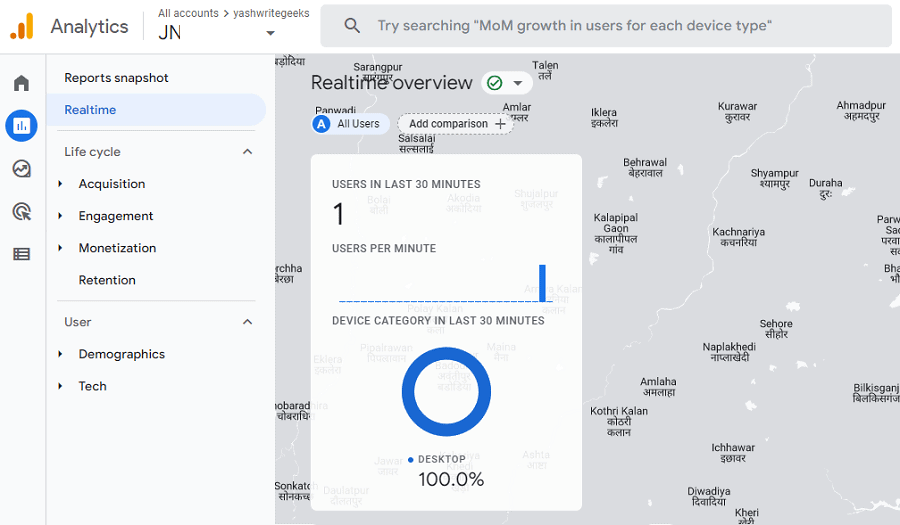
Google Analytics Verification via Real-Time Tab
Open up any webpage you would like on your website. Then Navigate to Reports > Real-Time. If Google Analytics works correctly, then you must be seeing the active user here.

FAQs About Google Analytics Installation on GeneratePress
Why is my google analytics not working?
When you install Google Analytics on a website, it takes time to reflect the traffic data. Wait for some time and recheck again. If the issue is still there, then contact the GeneratePress support team.
How to add google analytics to generatepress free version?
The best way to install GA on GeneratePress free version is via plugins. Since the elements module doesn’t found in a GeneratePress free version, the “Insert headers and footers plugin” would be the safest approach to get this task done.
Where to install google analytics code in wordpress?
Website header.
How to remove Google Analytics code?
The process of removing Google Analytics code from a website varies and depends on the installation method you have chosen.
In case you installed GA through the Insert headers and footers plugin, then simply navigate to Settings > Insert headers and footers and erase the GA script shown under the “Scripts in Header” box. Or if you installed GA through GeneratePress elements and hooks, then simply delete the Google Analytics hook element and you are good to go.
What is the best way to install Google Analytics on GeneratePress Theme
For users who are running a GeneratePress theme, the best way to install a Google Analytics is to use the GeneratePress element and hook technique. Else insert headers and footers plugin would be recommended.
Are these methods work for Google Analytics 4 installation?
Yes.
How to upgrade Universal Google Analytics to Google Analytics 4 on GeneratePress?
To upgrade universal analytics to Google Analytics 4 without migrating the configuration settings, just navigate to admin > GA4 Setup. Follow a few steps and get access to the GA 4 gtag.js code. Then paste the Google Analytics gtag.js code either with the GeneratePress hook element method or Insert Headers and Footers plugin.
Please note if you want to migrate existing configuration and tags from universal analytics to Google Analytics 4 then you have to build a connection between both properties. The instructions for connecting the site tags are listed in this Google support document.
What will happen with the Google Analytics code if we update the GeneratePress theme?
After the GeneratePress update, The Google Analytics code will remain active unless it has been added to the theme header.php file directly.
Do we have to add a Google Analytics tracking code to the head of each page or just the front page?
The Google Analytics code should be added to all pages of the website.
How to test Google Analytics?
The quickest way to test Google Analytics is to open a web page of your own website and see if Google Analytics shows active users in the real-time tab.
Can I put Google Analytics code in the footer?
No.
Recommended Reading:
- GeneratePress Unbiased Review: 2023 Updated
- GeneratePress vs Divi: Let’s End this Battle
- Elegant Themes Review: Is it Worthy or Not?
- GeneratePress vs Astra: Who’s the REAL Winner?
Final Thoughts on Google Analytics Installation on GeneratePress
The Google Analytics installation process is straightforward and will only take few minutes to complete. Don’t be confused about the methods. All 3 methods are 100% foolproof.
We personally recommend the GeneratePress Hook Element solution because it is actually recommended by the GeneratePress team and will be beneficial in the long run.
Act now. Upgrade to GeneratePress premium and install Google Analytics tracking code on your site via the GeneratePress Elements module.
Have you found this Google Analytics guide useful? If yes, please consider sharing it with your friends and let us know your queries in the comments.


This was so helpful, I had no idea it was possible to add the google analytics tag as an element with GP premium, it was so easy, thank you very much!